
Method1:
1. At first I removed the protection from system drive (i.e. partition in which your operating system is residing). In my case it was C:
Steps : System properties -> Advanced System Settings -> System Protection
Select System drive then click on configure, then choose option which says, turn off system protection.
2. Then I restarted the computer and hit f8 continuously to bring the startup menus (like one to start safemode in XP), from the options I choose to disable the driver signature.
3. After computer comes to working state, I installed the driver (Download Link), which I had downloaded from the cable manufacturer’s site. (For details view my previous post on vista)
4. I set the setup file in compatibility mode (For Windows XP SP2003). Then I ran the setup, which I already had extracted.
5. I got Drive Install Failure dialog box. Then I plugged the cable, windows starts to search for the drivers, I choose to manually install the driver, then I located the driver manually, and when asked choose to continue anyway with driver installation.
6. Then I tested it with HyperTerminal and also with Java Communication API, and it is working great.
Remember, You will have to disable driver signature verification every time you restart your computer, if you are willing to use USB to serial communication otherwise the drivers for HL340 cable can’t be installed, when you plug it to computer.
And the other problem I have seen so far is that, each time it is installed to computer, the PORT seems to be used and not released and thus system assigns the new address to the port i.e. each time you plug it to computer, a new address is assigned, suppose first time you plugged it, it assigns say, COM3, then when you use the cable second time, it assigns say COM4, and so on. And the total ports that can be used is upto COM255.
Let me know if you are having any problem during installation, please post error you received.
Method2:
If that doesn’t work you can try this one:
Stop the Hardware Policy Driver from. At first it is hidden, you have to enable the show hidden devices by clicking on the view > show hidden devices in device manager menu.
Then under non-plug and play devices, you will find the hardware policy driver, double-click on it, then select driver and click on stop. Under startup select demand.
Now search for another driver named Windows Firewall Authorization Driver under non-plug and play and repeat the same steps as you did for Hardware Policy Driver.
Then restart the computer by disable driver signature.
Once computer is in working state, Select the driver setup file, right-click on it, select troubleshoot compatibility, then select try recommended settings, and then click on start program. When asked to install driver select continue anyway.
This helps sometimes, I got it work twice, my luck.
Sunday, February 28, 2010
Friday, February 5, 2010
Symbian goes Open Source
Now that Symbian has fully opened its source code to the public, will it lead to an avalanche of mobile operating systems opening up their codes as well?
After all, Symbian and Google's Android mobile operating system offer application developers and device manufacturers free operating systems for their products. Will this put pressure on other operating systems to open up their source codes to stay relevant?
The answer is, "Not likely." As ABI Research analyst Kevin Burden has noted, two of the most widely used mobile systems in the world -- Apple and Research in Motion's BlackBerry -- are wholly managed from within by their owners. In other words, Apple and RIM have found tremendous success with their operating systems despite the fact that they're the only device manufacturers that use them.
"The device manufacturers who have made the biggest strides in the market are the ones who own the whole solution, from the hardware to the platform to the application stores," he says. "I don't think we'll see Apple or Palm try to reverse that anytime soon."
And although Symbian is already the most widely used mobile operating system in the world, its decision to open up its source code is more likely an attempt to push back a challenge from Android than to undercut the proprietary mobile operating systems such as iPhone and BlackBerry. Android is projected to become the second-most used mobile operating system behind Symbian by the end of 2012.
IDC analyst John Delaney says that Symbian's decision to open up its source code is only one part of its effort to forge better relationships with developers that have been heavily courted by Apple and Google in recent years. And in any case, he says that Symbian's bigger draw for developers is the sheer number of users it has and not the fact that it now has an open source code.
"What developers want at the end of the day is to make money," he notes. "And that is directly related to the number of users a platform has."
So looking toward the future, it seems we can expect a mix of open source platforms and proprietary platforms, especially since both Apple and RIM have shown they can be successful without relying on third parties to develop and sell devices with their operating systems. Indeed, as Burden notes, RIM still has room to grow with its BlackBerry platform as it will start really targeting the Asian market over the next few years.
"RIM has got a lot more space to grow because they're only now getting into many parts of Asia," he says. "I don't think we've gotten to point yet where proprietary platform providers are talking about changing their strategies."
Friday, January 29, 2010
Configure Eclipse Editor for Java
For Java
For java we need to first create the project then create package then create class. This is how we do. Then for debug and running the project we need to make some settings. Here I will teach you how to create java project and debug the java source code.
First let’s look how to setup our project for java.
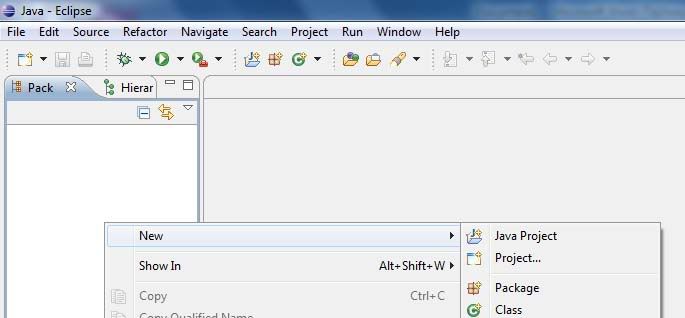
1. Right click on the package explorer.
a. If package explorer is not shown by default, open it from main menu. Click on Window > Show View > Package Explorer.

2. Select New > Java Project
You’ll get a dialog box shown below.

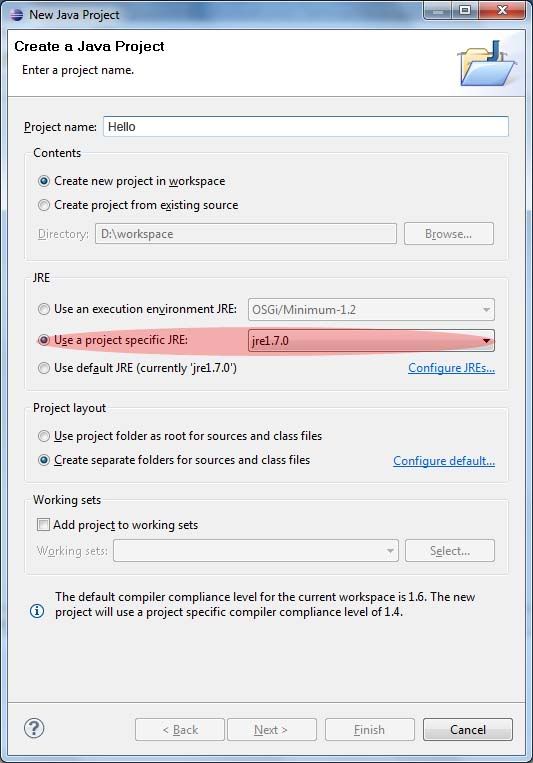
3. Enter project name, I choose hello
Under JRE, select Use a project specific JRE, then click Finish
Note : Eclipse creates a folder under workspace with the project name you give here.
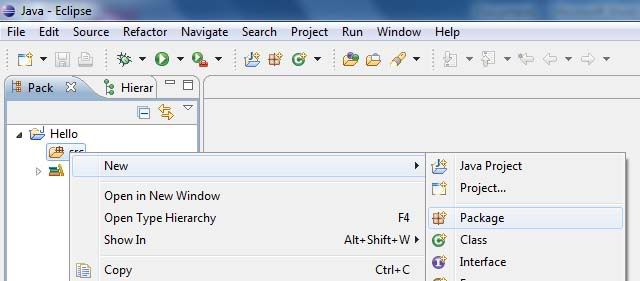
4. Expand Hello, right click on src folder, select New > Package

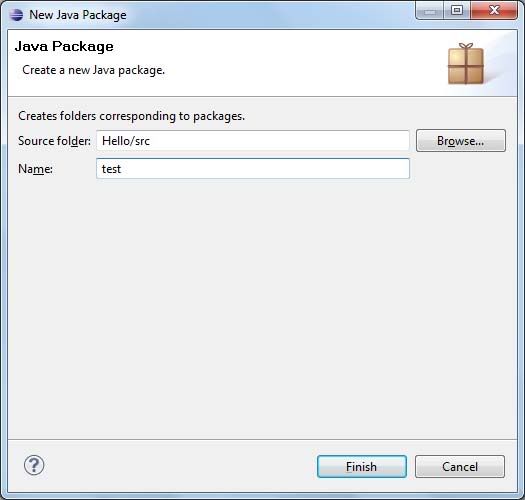
5. Enter name for the package, I choose test.

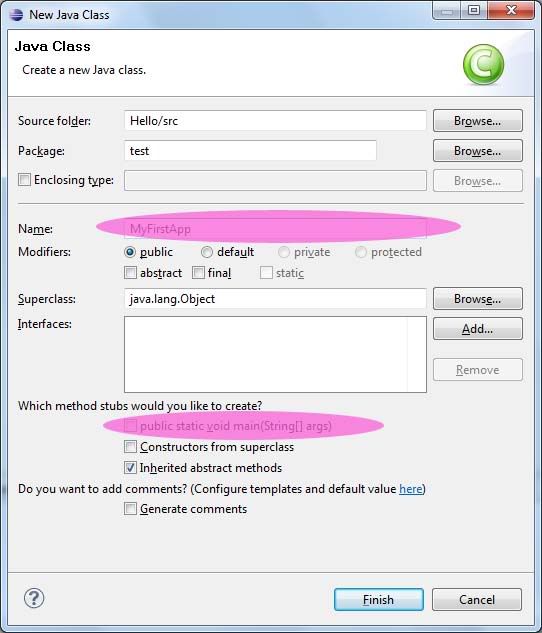
6. Then select the package you created, right-click on it, then select New > Class
Give the name for your class, remember in Java, the class name always begins with capital letter.
I choose MyFirstApp
Below you’ll see where it reads which methods stubs would you like to create?
Under this enable the first option, which reads
Public static void main(String []args)
Enabling this option will add, public static void main(String[] args) body to the class which you are going to create.

Then you’ll see the code similar to the one below :
package test;
public class MyFirstApp {
/**
* @param args
*/
public static void main(String[] args) {
// TODO Auto-generated method stub
}
}
7. Inside the main body, enter the code for eg.
System.out.println(“My first App in Eclipse”);
So the full source looks :
package test;
public class MyFirstApp {
/**
* @param args
*/
public static void main(String[] args) {
// TODO Auto-generated method stub
System.out.println("Hello");
}
}
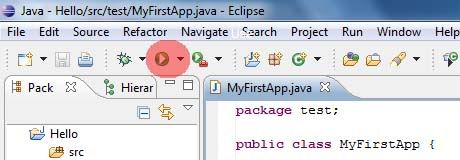
8. To run the program, there are three different ways,
a. Select Run from Main Menu then select Run.
b. Use shortcut Ctrl+F11
c. Use the play like button on the toolbar, it is shown in the figure below.

9. You’ll see the result under console dialog. The output is Hello.
I hope you learnt how to code and run java in eclipse. Now you also need to learn how to debug java programs in eclipse.
For java we need to first create the project then create package then create class. This is how we do. Then for debug and running the project we need to make some settings. Here I will teach you how to create java project and debug the java source code.
First let’s look how to setup our project for java.
1. Right click on the package explorer.
a. If package explorer is not shown by default, open it from main menu. Click on Window > Show View > Package Explorer.
2. Select New > Java Project
You’ll get a dialog box shown below.
3. Enter project name, I choose hello
Under JRE, select Use a project specific JRE, then click Finish
Note : Eclipse creates a folder under workspace with the project name you give here.
4. Expand Hello, right click on src folder, select New > Package
5. Enter name for the package, I choose test.
6. Then select the package you created, right-click on it, then select New > Class
Give the name for your class, remember in Java, the class name always begins with capital letter.
I choose MyFirstApp
Below you’ll see where it reads which methods stubs would you like to create?
Under this enable the first option, which reads
Public static void main(String []args)
Enabling this option will add, public static void main(String[] args) body to the class which you are going to create.
Then you’ll see the code similar to the one below :
package test;
public class MyFirstApp {
/**
* @param args
*/
public static void main(String[] args) {
// TODO Auto-generated method stub
}
}
7. Inside the main body, enter the code for eg.
System.out.println(“My first App in Eclipse”);
So the full source looks :
package test;
public class MyFirstApp {
/**
* @param args
*/
public static void main(String[] args) {
// TODO Auto-generated method stub
System.out.println("Hello");
}
}
8. To run the program, there are three different ways,
a. Select Run from Main Menu then select Run.
b. Use shortcut Ctrl+F11
c. Use the play like button on the toolbar, it is shown in the figure below.
9. You’ll see the result under console dialog. The output is Hello.
I hope you learnt how to code and run java in eclipse. Now you also need to learn how to debug java programs in eclipse.
Wednesday, January 27, 2010
Install HL340 cable in Windows Vista(64 Bit)
Here is how I installed HL-340 cable drivers in my laptop(hpdv4 12cell batteries) which have Windows Vista (64 bit) Operating System.
At first I downloaded the latest driver for HL340 cable from its manufacturer. I found this link forum (link to foru ), while I was too searching for vista compatible drivers for HL340 cable.
I wondered if it would work in Vista (64 bit). Unfortunately, it didn’t work for me. Then what I did was installed it in XP. Luckily I have a computer running XP with me. It successfully installed in XP. After loitering for some moments I found that the setup file extracted the drivers to the root directory of my system i.e. C:\WCH.CN. I said to myself wow, I can try with this. I copied the folder to my flashdrive, then pasted it to my laptop’s desktop. Then fullpath to the driver location is: C:\Users\Alex\Desktop\CH341SER
Then I plugged the HL340 cable. Vista tried installing the drivers for cable; I selected to locate and install driver automatically, since it couldn’t find one, asked me to insert CD, I choosed to manually locate the driver location. Then pasted the fullpath to the drivers location i.e. C:\Users\Alex\Desktop\CH341SER.
After some moments, a dialog came up saying the driver is not digitally signed. I selected to continue anyway. Within a minute, it showed me a successful installed message.
To confirm, I checked it through HyperTerminal(Get HyperTerminal for Vista). Voila it worked.
Summary :
1. Start the computer/laptop and Press F8 continuously and disable the digital driver signing.
2. Disable the User Access Control (UAC)
a. Control Panel -> User Accounts
b. Select Turn User Account Control on or off
c. Uncheck the tick mark, then hit OK.
d. When asked, don’t restart.
e. Close control panel, you have disabled the UAC.
By disabling UAC, you computer will not ask for you permission each time you write to system drive.
3. Download drivers for HL340 cable (Download Link Here). I zipped the drivers which I downloaded from its manufacturer. Password for zip is HL340.
4. Extract the zip file to the desktop or any another location you remember.
5. Copy the full path of the driver’s location.
6. Plug the HL340 usb to serial cable. When asked choose to install driver manually then paste the location, which you copied in step 4. Then click next.
7. When asked select Continue Anyway.
8. Within a minute you will get a message saying that device is installed and ready to use.
9. Now you can check it with HyperTerminal (Get HyperTerminal for Vista). Password for zip is HT340.
10. Make the proper settings and check with commands. I assume you know how to do it. I tested it with GPRS Modem which I am using for a project.
Sony's PlayStation 3 (PS3) has been hacked by US hacker
 A US hacker who gained notoriety for unlocking Apple's iPhone as a teenager has told BBC News that he has now hacked Sony's PlayStation 3 (PS3).
George Hotz said the hack, which could allow people to run pirated games or homemade software, took him five weeks.
He said he was still refining the technique but intended to post full details online soon.
The PS3 is the only games console that has not been hacked, despite being on the market for three years.
"It's supposed to be unhackable - but nothing is unhackable," Mr Hotz told BBC News.
"I can now do whatever I want with the system. It's like I've got an awesome new power - I'm just not sure how to wield it."
Sony said it was "investigating the report" and would "clarify the situation" when it had more information.
'Open curiosity'
Mr Hotz said that he had begun the hack last summer when he had spent three weeks analysing the hardware.
After a long break, he spent a further two weeks cracking the console, which he described as a "very secure system".
He said that he was not yet ready to reveal the full details of the hack but said that it was "5% hardware and 95% software".
Playstation 3 (Sony)
The hack could allow gamers to play pirated games
"You can use hardware to inject an insecurity and then you can build on that," he said.
He admitted that he had not managed to hack the whole system, including the protected memory, but had worked out ways to trick the console into doing what he wanted.
Mr Hotz said that he was continuing to work on the hack and, once finished, would publish details online in a similar way to his previous iPhone exploits.
In particular, he said, he would publish details of the console's "root key", a master code that once known would make it easier for others to decipher and hack other security features on the console.
He said his motivation was "curiosity" and "opening up the platform".
"To tell you the truth, I've never really played a PS3," he said. "I have one game, but I've never really played it."
Opening the system could allow people to install other operating systems on their console and play homemade games, he said.
In addition, he said, the hack would allow people to play older PS2 games on their consoles.
Recent versions of the PS3 do not have the ability to play PS2 games after Sony controversially removed a piece of hardware.
He admitted that it could also allow people to run pirated games.
"I'm not going to personally have anything to do with that," he told BBC News.
Gaming firms do not take the issue of game piracy and console modification lightly. Recently, Microsoft disconnected thousands of gamers from its online gaming service Xbox Live for modifying their consoles to play pirated games.
Mr Hotz said that the nature of his PS3 hack means that Sony may have difficulty patching the exploit.
"We are investigating the report and will clarify the situation once we have more information," said a Sony spokesman.
Mr Hotz rose to fame in 2007 at the age of 17 when he unlocked the iPhone, which could only be used on the AT&T network in the US at launch.
The hack allowed the popular handset to be used on any network.
He has since released various other hacks, allowing people to unlock later versions of the popular handset.
Sunday, January 17, 2010
My Introduction to Blogging World
I have just started to blog. I will be blogging on tech gadgets and IT fields and about my perosnal views for differnet topics. I have started this blog so other can learn from what I have learn from internet and what I have gained today by reading the papers that I read daily here in Nepal. I will also be blogging about the places that I have been to and will post the snaps that I have taken from differnet places. You can use matter here by my permission only If found that you are using the content of site without my permission then legal actions can be taken depending on the level of breachment.